
Monthly contributor post from Kristen at Celebrate Every Day with Me:

If you have a child who can braid and use a needle and thread, they will have a blast making this braided coaster. And it makes a great homemade gift for mom or dad. *wink, wink*
My 5 year old daughter and I spent an enjoyable afternoon making the braided coaster together. She helped tie the material and I took care of the sewing, braiding and hot gluing.
What You’ll Need:
- A long-sleeved shirt*
- Scissors
- 2 Safety Pins
- Needle & Thread
- Felt
- Hot Glue Gun
*I used one of my husband’s old dress shirts. You can also use a pair of pants or even socks, although I suggest new if you’re thinking about socks. 😉
How to Make a Braided Coaster:
1. Lay out the shirt and make sure the sleeve is straight. Cut both sleeves into 1″ wide rings.

2. Divide all the loops into three groups. Since our shirt sleeve loops varied in lengths, we separated the varying lengths equally. Each pile had about the same number of long pieces, short pieces, etc. Your goal is to have three chains approximately 2 yards long. (Our shirt made one coaster.)

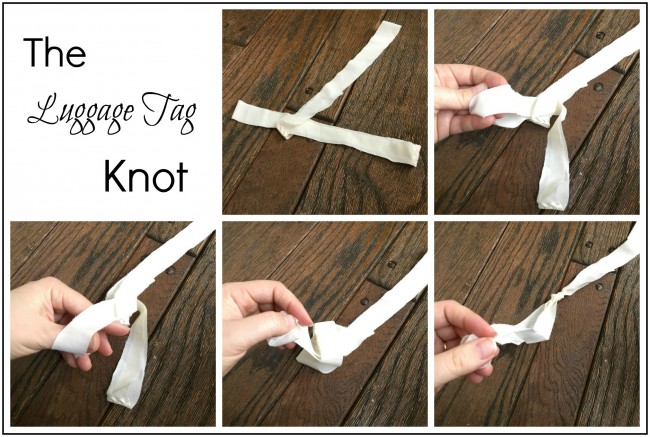
3. Tie each group into it’s own long strand. Use the “luggage tag” knot . . . you know, the kind you use when you put a luggage tag on your suitcase. It probably has an official knot name, but I’m guessing you’ll know exactly what I mean.

4. Pin the three ends together and begin braiding. Either have someone hold the other end or pin one end to something sturdy.


5. Once you’re done braiding, pin the other end together.


6. Sew the beginning of the braid so that you can unpin and snip the excess.

7. Start to coil the braid. Sew as you go along from the underneath side. Continue until you have finished your braid or created the size coaster you want.


8. Once finished coiling the coaster, snip the end off and sew the end.

Incidentally, if you’ve used a white/cream shirt and want to add some fun color. Try dipping part of all of the coaster in a fabric dye. My daughter totally wanted to do this and we will on the next one.
9. To cover the unfinished side, trace the coaster on a piece of felt, cut and hot glue them together.


* You won’t want to put a condensing glass with cold beverage atop the braided coaster on your favorite wood table as the coaster is only made of material. It is thick but there is no guarantee of being thick enough to be waterproof. Consider adding a thin sheet of cork to the bottom to help with this or just use the coaster for drinks that won’t condense.


Enjoy!
What crafts do you like to do with your kids?
Kristen of Celebrate Every Day With Me is a fun-loving mom to two kids who keep her busy and laughing. Add her great husband and the Lord to the mix and her life is one fantastic (and sometimes crazy) adventure. She is a former youth leader, professional wedding and event planner and has a degree in Christian Thought/Christian Ministry. She loves long lists, diet soda and playing jokes on her husband.
Kristen is the author of Teach Me To Serve: 99 Ways Preschoolers Can Learn To Serve & Bless Others. On her blog, you’ll find fun ideas for children’s activities, creating memorable moments and party planning.
Leave a Reply